From Idea to Production: Building a Full Health App in One Session with Claude Code

The era of "vibe coding" is officially here. Instead of getting bogged down in boilerplate, you can now build a full-featured application—including user authentication, database management, and AI integration—in a single session. In this guide, we’ll walk through the process of building a comprehensive Health App that allows users to create wellness groups, track health goals, and receive AI-powered health suggestions.
Step 1: Initialize Your Environment
To start, you need a modern code editor like Cursor or VS Code. We will use a specialized boilerplate template designed for agentic development. Open a terminal in your project folder and run:
npx create-agentic-app@latest .
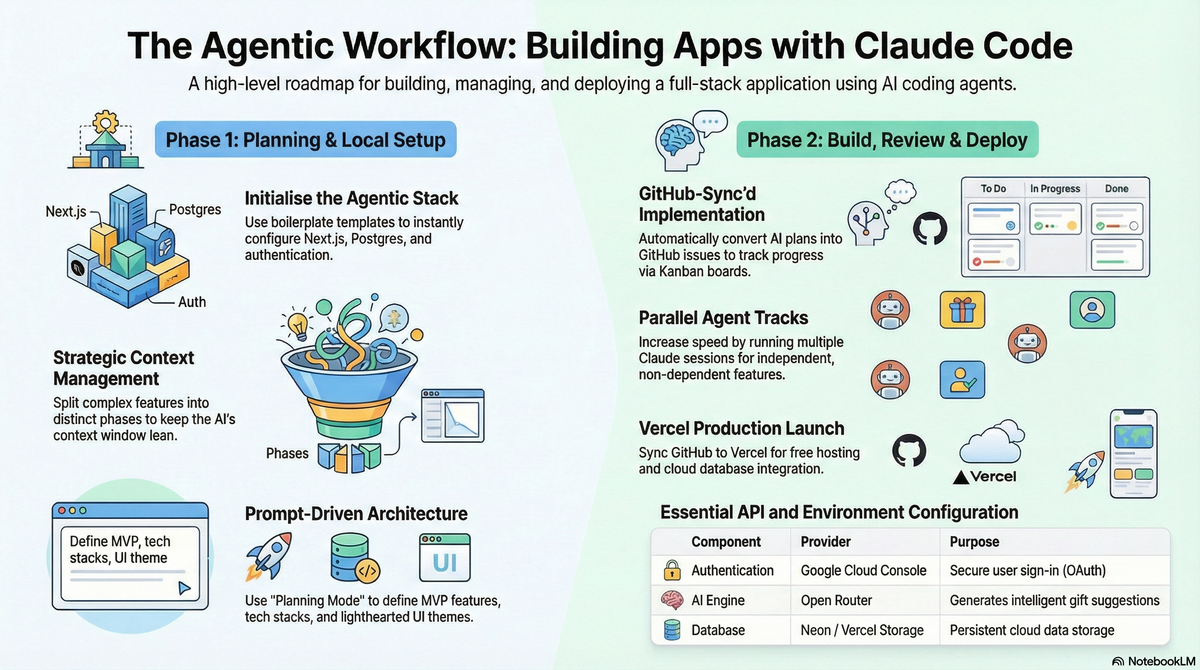
This command copies all necessary boilerplate files into your root directory and installs your dependencies. This stack includes Next.js for the frontend and backend, Postgres for data, Better Auth for security, and the Vercel AI SDK for intelligent features.
Step 2: Setting Up Your Coding Agent
While you can use built-in IDE agents, the Claude Code CLI offers a powerful way to manage the entire build process.
- Install the CLI: Follow the instructions for your OS to install the
claudecommand. - Authenticate: Run
claudein your terminal and sign in using your Claude subscription or an API key. - Switch Modes: You can toggle between Planning Mode (to discuss features) and Auto-Accept Mode (to let the agent write code) by holding
Shiftand pressingTab.
Step 3: Planning the Health App Features
Start by telling the agent exactly what you want to build. For our Health App, we asked for:
- User Groups: Join communities for specific fitness or wellness goals.
- Goal Tracking: Share and monitor health progress within those groups.
- AI Suggestions: Leveraging Open Router to provide personalised wellness recommendations.
- Google OAuth: For seamless login.
To keep the project manageable, the agent will use the create-feature command to generate a requirements file, a step-by-step implementation plan, and an actions required list.
Step 4: Configuring Local Infrastructure
Your app needs a place to store health data. The easiest way to handle this is via Docker Desktop.
- Environment Variables: Update your
.envfile with your Google Client ID, Google Secret, and Open Router API Key. - Authorized Redirects: When setting up Google OAuth at
cloud.google.com, ensure your redirect URI is set tohttp://localhost:3000/api/auth/callback/googlefor local testing.
Start Postgres: In your docker-compose.yml, define your database name (e.g., health_app_db) and run:
docker compose up -d
```.
Step 5: The Agentic Workflow
One of the most powerful features of this setup is the ability to track progress through GitHub Issues. By running the command publish-to-github, the agent creates a board where every phase of the Health App (e.g., "Phase 1: Database Schema," "Phase 2: UI Design") is a trackable issue.
To start the build, simply run:
continue-feature
The agent will intelligently read the next task from GitHub, implement the code, run a lint check, and even perform database migrations automatically.
Step 6: Testing and Refining the UI
Once the core logic is built, start your development server:
npm run dev
Open localhost:3000 to see your app in action. If the UI feels "bland," you can ask the agent to improve the styling. For example, we replaced a standard background with a dynamic Aurora effect by simply providing the agent with a URL to the component.
Step 7: Deployment to Production
The final step is making your Health App public using Vercel.
- Commit Changes: Use
/checkpointto let Claude Code write your final commit messages. - Production Database: Create a Neon Postgres database through the Vercel Storage tab.
- Final Build Check: Before deploying, run
npm run buildlocally to ensure there are no type errors or linting issues. - Sync Environment Variables: Copy your production database URL and Google production credentials into the Vercel dashboard.
Once the build is complete, your Health App is live and ready for users to join groups, track their wellness, and get AI-driven health advice.