Ride the Vibe: Local Coding Bliss with OpenCode.ai, Ollama, and Cursor

The era of "Vibe Coding" is here. Coined by Andrej Karpathy, it describes a shift from writing every line of code manually to guiding an AI agent to generate, refine, and debug applications through natural conversation. It's fast, iterative, and—when done right—unbelievably satisfying.
But for many, the hurdle is privacy, cost, and latency. Relying on cloud-based giants like OpenAI or Anthropic means sending your proprietary context over the wire.
Today, we're building the ultimate local vibe coding stack. We'll be using Ollama to run models locally, Cursor as our AI-powered editor, and the new powerhouse, OpenCode.ai, as our open-source, terminal-based coding agent.
Why Local AI is the Real Vibe
Cloud AI is powerful, but local AI is personal. Here’s why your vibe coding environment should reside on your machine:
- Total Privacy: Your code, context, and prompts never leave your hardware. This is essential for proprietary projects, sensitive data, or any developer concerned with IP.
- Zero Latency: No network lag means instant responses. When you’re in the "vibe," a 5-second wait for a token stream kills the momentum. Local is snappy.
- Cost Effective (Free!): After you purchase your hardware, running open-source models like Llama 3 or Gemma 4 is completely free. No subscriptions, no token limits.
- Offline Independence: Work anywhere—on a plane, in a coffee shop with bad Wi-Fi—without losing your AI assistant.
The Setup: Your 10-Minute Guide
We need three components working together. Let's get them installed.
1. Install Ollama (The Model Runner)
Ollama is the easiest way to run LLMs on macOS, Linux, and Windows.
- Download it from ollama.com.
Pull a Coding Model: We need a good coding model. Start with Llama 3 or Gemma.Bash
ollama pull llama3
Run the installation script (Mac/Linux):Bash
curl -fsSL https://ollama.com/install.sh | sh
2. Install Cursor (The Editor)
Cursor is a fork of VS Code designed purely for AI collaboration.
- Download it from cursor.sh.
- During setup, under Settings > AI, make sure you enable local model usage if prompted, or simply set Cursor to use its own models (it handles context seamlessly).
3. Install OpenCode.ai (The Agent)
OpenCode is an open-source terminal interface that acts as an autonomous coding agent. It connects your editor, your terminal, and your local AI model.
Install via curl:Bash
curl -fsSL https://opencode.ai/install | bash
4. Connect the Dots: OpenCode + Ollama
We must tell OpenCode to use the local Ollama instance instead of cloud APIs.
Open or create your OpenCode config file (usually ~/.config/opencode/opencode.json):JSON
{
  "$schema": "https://opencode.ai/config.json",
  "provider": {
    "ollama": {
      "npm": "@ai-sdk/openai-compatible",
      "options": {
        "baseURL": "http://localhost:11434/v1"
      },
      "models": {
        "llama3": {
          "name": "Llama 3"
        }
      }
    }
  },
  "model": "ollama/llama3"
}
Now you are ready to vibe.
The Vibe Coding Workflow
- Open Cursor: Open your project folder in Cursor.
- Launch OpenCode: Open the integrated terminal within Cursor and type
opencode. You are now chatting with your local Llama 3 agent within the context of your codebase. - Chat & Generate: Ask OpenCode to create files, write functions, or explain bugs.
- You: "Create a new React component called
UserCardinsrc/componentsthat displays a name and email prop."
- You: "Create a new React component called
- Instant Edits: OpenCode doesn't just output code; it can directly modify your files in the background. Cursor will instantly update to show the changes.
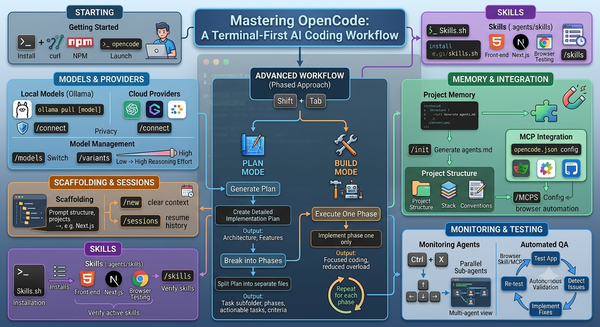
Core Workflow Commands
These are the primary commands you will use to manage your interaction with the LLM.
/init(Keybind:ctrl+x i): This is the essential first step. It provides a guided setup for creating or updating yourAGENTS.mdfile, which defines how the AI behaves in your project./new(Keybind:ctrl+x n): Quickly clears the current session to start a fresh conversation. Useful when switching tasks within the same directory./undo(Keybind:ctrl+x u): A powerful safety net. It removes the last message and response, and importantly, it reverts any file changes made by the AI (requires a Git repository)./redo(Keybind:ctrl+x r): Restores a message and its associated file changes that were previously undone.
Context & File Management
@filename: While not a "slash command," this is the most frequent way to provide context. Typing@triggers a fuzzy search to reference specific files in your prompt.!command: Use the exclamation mark to run a shell command (like!ls -laor!npm test) directly from the TUI. The output is automatically added to the conversation context./compact(Keybind:ctrl+x c): Summarizes the current session. This is vital for long conversations to stay within the model's context window limits.
Configuration & Tools
/connect: The go-to command for initial setup or adding new AI providers and API keys./models(Keybind:ctrl+x m): Displays a list of available models, allowing you to see which ones you can switch between for different tasks./thinking: Toggles the visibility of the model's reasoning process. This is extremely helpful for debugging why a model suggested a specific (or incorrect) solution./editor(Keybind:ctrl+x e): Opens your external system editor (like VS Code or Vim) to compose complex, multi-line prompts that are difficult to type in a terminal.
Quick Reference Table
| Command | Keybind | Purpose |
/help | ctrl+x h | Shows the full command list and help dialog. |
/exit | ctrl+x q | Quits the TUI. |
/sessions | ctrl+x l | Lists and switches between previous chat sessions. |
/export | ctrl+x x | Exports the current chat to a Markdown file. |
Pro Tip: Most commands use ctrl+x as the "leader key." You can customize this in your tui.json file if it conflicts with your terminal's existing shortcuts.